I’m helping my friend Jenny learn how to use wordpress.
Helping Jenny
Reply

I’m helping my friend Jenny learn how to use wordpress.
What is Polymer Clay?
Polymer clay is a man-made clay that uses PVC as its base. What makes Polymer clay so wonderful to me is the infinite ways that it can be used. It can be molded, sculpted, and extruded. The surface can be stamped, textured, embellished with powders, paints, or metallic leafs. Once baked it can be carved, sawn, cut, drilled, glued, painted, sanded, and buffed. It is compatible with – and often bonds to – objects and other materials that can withstand the low baking temperature required to cure the clay. It is available in a wide variety of colors that are mixable to produce an infinite palette. It can be made to imitate other materials, such as leather, gemstones, glass, stone, or wood. Perhaps the most amazing property of PC is its ability to stretch, reduce, and retain the color and proportion of assembled shapes – called “canes”.


There are many brands out there to work with. I’ve used them all over the years but prefer Premo and Souffle which are both made by Polyform Products. I particularly like Souffle when working with the cutters. It is durable and has a suede like feeling that seems to give a slightly cleaner cut. I have also done testing with Cernit, Fimo 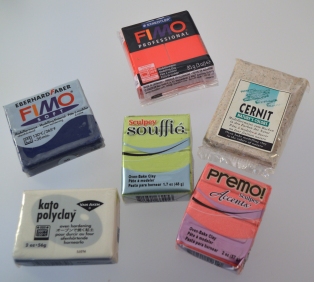
Professional, and Kato Polyclay. They are all excellent products and if you are already experienced with a particular brand it will work fine with the cutters. No need to go out and buy more clay. I would not suggest Sculpey III or non-branded clays from the Big Box stores. They are made for kids and the quality of the finished products is not very good.
Basic Tools
You needn’t spend a fortune to get started with polymer clay. Tools can be stolen from your kitchen, someone’s workshop, and picked up at garage sales (a great place to find the manual pasta machines). Tools used with polymer clay should NEVER come in contact with food again.
The Must Haves:
Work Surface – a large, smooth ceramic tile or smooth glass cutting board is best. Do not work on, or store, raw polymer clay on unprotected wooden furniture. The chemicals in polymer clay can dissolve the finish. Paper is not enough protection between your clay and wood furniture. The plasticizers will leach through the paper very quickly.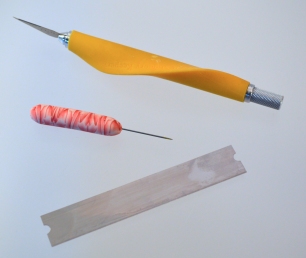
Cutting Tools – an Exacto knife, or scalpel, plus a polymer clay blade. This is a very thin long blade and is particularly helpful when working with clay and the cutters. In a pinch you can use
a scraper blade that is made for scraping wall paper from walls and can be found at most hardware and home improvement stores.
Conditioning and Sheeting Clay – Polymer clay needs to be ‘conditioned’ before you work with it. You can use your hands by squeezing and twisting the clay to soften it and redistribute the plasticizers that have settled in the package. You can also use a lucite, plastic, or metal rolling pin. However, the best way to condition the use a manual pasta machine or a made-for-polymer clay conditioning machine. Soften and flatten the clay before putting it though the machine at 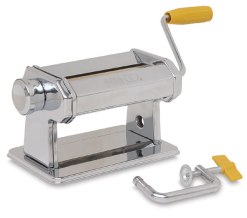 the thickest setting so you don’t strip the gears. Continue by folding and rolling the clay through the various settings until the clay is soft, supple, and has a slight sheen. When cutting the clay with a cutting machine it is very important to have a consistently even sheet of clay and to know the thickness of that sheet. The best way to measure the thickness is with a conditioning machine.
Curing the Clay
One of the great things about polymer clay is that it cures in a normal oven and does not require a kiln. It is VERY important that you follow package directions about baking temperatures. You MUST use an oven thermometer to test the actual temperature of the oven you’re using. Polym er Clay will BURN above 325 degrees and can emit noxious fumes. I suggest that you calibrate your in the following way:
The length of baking depends on the thickness of the clay. Minimum time for complete curing is 20 minutes. Polymer can be baked for longer periods as long as the temperature does not change significantly. It can also withstand multiple bakings. I bake pretty much everything for 40 – 50 mins.
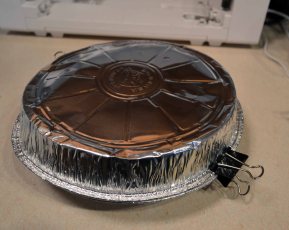 If you use your kitchen oven you should bake your clay inside of a baking bag, a covered casserole, or two aluminum foil baking pans clamped together which are only used for baking clay.
NEVER use a microwave to warm or bake. Small toaster ovens are not a good choice because the temperature spikes too much. A tabletop convection oven/toaster is ideal.
Polymer clay should be stored in a cool place away from heat and sunlight. Storing near a window that gets a lot of sun is a no-no. Also, don’t leave it sitting in the car in warm weather as it starts to cure when exposed to 90 degrees for a period of time. Polymer clay reacts with most clear plastics but stores well in frosted plastic like Plano fishing tackle organizers and rolling plastic drawers found at office supply and discount stores. It can also be stored in ziplock plastic bags and clear plastic wrap.
More Curing tips:
I’ve only scratched the surface about working with polymer clay. The following links and books will help you find you way with issues I haven’t touched on here.
POLYMER CLAY RESOURCES
Internet
Craftcast – www.craftcast.com – Allison Lee’s great site for live webinars, podcasts, and video tutorials
The Blue Bottle Tree – www.TheBlueBottleTree.com – Ginger Davis Allman has compiled a super site that includes tutorials, comparisons of products, and general information.
Polymer Clay Tutor – www.beadsandbeading.com – Cindy Lietz runs this blog site and there is a lot of good information for beginners there.
CraftEdu – www.craftedu.com – is a project from Donna Kato that offers online classes in lots of mediums, but especially in polymer clay. Also includes a lot of free tutorials.
Polymer Clay Express – www.polymerclayexpress.com – They carry any and everything that relates to polymer clay. Great to deal with and their prices are very good, although freight can be high on clay.
BOOKS
There are a ton of books that focus on all types of polymer clay techniques and projects. And new ones come out almost every month. If you can only buy one book each of these cover a lot of information.
Polymer Clay 101: Master Basic Skills and Techniques Easily through Step-by-Step Instruction by Kim Otterbein and Angela Mabray
The Polymer Clay Techniques Book by Sue Heaser
Making Polymer Clay Beads: Step-by-Step Techniques for Creating Beautiful Ornamental Beads by Carol Blackburn
So, almost everybody knows that Adult Coloring is quite a thing. Folks have coloring parties. It was/is so popular that Prismacolors had a horrible time keeping stores and websites supplied. I waited 6 months for a few specific colors last year. People fill up Craftsman tool carriers with all of their pens, pencils, crayons, and markers.
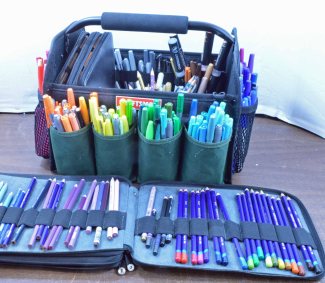 I LOVE coloring. I do it at night while watching TV. Sometimes I get so lost in coloring that I look up and it is 2am. I have 2 YHUUUGE notebooks full of finished pages. I created a form to keep track of my pens, pencils, and markers by color family so I can easily pick which color I need.
I use coloring to try out color schemes that I might use in my polymer designs. I see design elements that may show up later in a cane design. I try and justify it as a important part of my art/business. But in r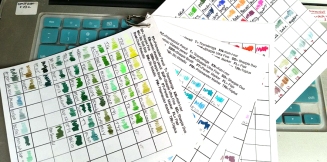 eality, I just like coloring. Always have. But what to do with all of these finished pages? One day in a future studio they might be framed and grace the walls. But I don’t have wall space now. And so they sit in page protectors.


Then I had a great idea! Why not make transfers of the images and create some jewelry pieces. Well, it turned into a class for Craftcast.com that was so much fun to develop. The ideas just kept coming.


The class is Creating Polymer Jewelry from your Colored Artwork. It takes you step by step to create transfers from anything that can be printed on a sheet of paper. The BIG  secret??? Avery Fabric transfer paper for ink jet printers and Fimo Gel. I’ve tried all the other alternatives and this is what works best for me. You can also do a direct to clay transfer with Avery transfer paper as I did with the green bowl shown above. You just have to remember that they are ‘see through’. So anything that is white in your images will show the color of the clay underneath. And the clay color will affect the colors in the transfer.
I also experimented with some shrink plastic and resin to make jewelry. I had never really played with ‘shrinky dinks’. But I had always been mesmerized when ever I saw the magic that happens when you put a flat piece of film into the oven. However, it always looked ‘cheap’ to me. Once I coated the pieces with doming resin my mind was changed. I used the new white and clear shrink plastic from Silhouette Shrink Plastic and the Grafix Injet Shrink Film. These are some more of my coloring pages that I used. I think that I will be playing with this a bit more in the near future. Watch this space….


I m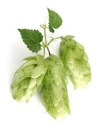 ake and sell an awful lot of hop inspired jewelry and beer related accessories. Hops are what make beer taste like beer. My DH is a home brewer and we are entrenched in the craft beer scene in Vermont and Asheville, NC. What started as a lark to wear at beer festivals has become a serious piece of my business. So much so that I couldn’t keep up with the demand just using aspic cutters to make the beads.
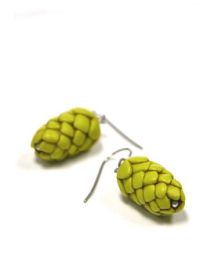
My DH said that there had to be another way. And he was right…..as always. I started with the Cricut Cake Cutter. It was meant to cut fondant and that’s about the same consistency of raw polymer clay. And it worked for awhile. I switched to a MAC and they decided not to support that OS. I was able to cobble along with a half broken PC laptop while desperately looking for another option.
We searched around and found a professional cutter – the Silver Bullet – that looked like it could handle the raw clay. And it does. It’s BIG and powerful and able to cut, etch, carve, and all kinds of wonderful things on all kinds of media. It was a huge investment.But something that we needed to do.
About the same time Alison Lee at Craftcast.com found out I was cutting raw polymer on a digital cutter. She asked if I could do a class using the Silhouette Cameo with polymer. She already had several classes using the Cameo to make projects from paper and metal clay. Her base had the machine and she wanted to give them something else to do with it. I wasn’t sure if I could get it to work with polymer. I googled and didn’t find a lot going on with polymer. There were just a few instances and in all cases the clay had to be very, very, very thin. 
I had a friend come over who was using the Cameo with metal clay. We tried everything. We could get it to cut, but it left ‘smoosh’ marks all over the clay. The only way it would work was if the clay was really, really thin. I didn’t think that would be every useful. Then the DH poked his nose into the studio to see how it was going. Hair was being pulled out at this point and there was a lot of swearing. We recapped the problems and he looked it over. Then he very casually said -“why don’t you take the cap off the blade?” Yet again…. he was right. That was the secret.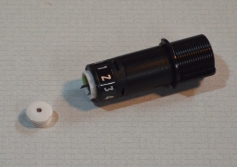
It was the cap that was causing the ‘smooshing’.
With that gone we were now able to cut thicker pieces of clay that were more usable. But the Cameo still had a limit to the thickness it could cut. Mostly because of the layout of the machine that was meant to cut paper, card stock, and vinyl.
I was able to create a version of my Fantasy Flower Garden necklaces for the class. (The image at the top of the page is a bridal version of that collection). I even used the Silhouette Studio Software to design the flower shapes, colors, and layout of the piece.


I continued to experiment with the Cameo to create other projects. I made some ornaments and some what-not bowls.


About a year later Silhouette announced a new machine – the Curio. It was built to handle a variety of media in different thicknesses. It has adjustable plat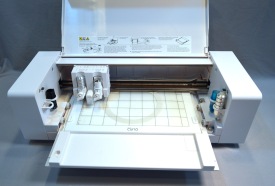 forms and a dual tool holder. By now I was on Silhouette’s radar and was able to score a machine early on for testing with clay. It worked great. I could cut much thicker clay and could even use special tools to carve the raw clay.
My next class on Craftcast took advantage of those properties. I taught my recipes for faux gemstones and ivory. Then we created a box using the faux ivory and the Curio to cut out spaces to inlay the faux gemstones and carve designs on the lid and sides of the box.


Last year I connected with Terri Johnson who organizes the All Things Silhouette conferences. I did presentations at two of the conferences last year and will be participating this year. The conferences are held outside Atlanta, GA – June 10-11 and November 4-5. Terri puts on an A+++ event. Lots of great people sharing lots of tips and techniques. Since I never got these machines to use them for the purposes they were intended I learn quite a lot at these events. lol
I host a PC SILie Lovers group on Facebook. The ‘files’ section has lots of documents that cover the settings I use to cut different thicknesses of clay. There is a lot of useful information there. But the best way to learn the tips and tricks is by taking the Craftcast classes.
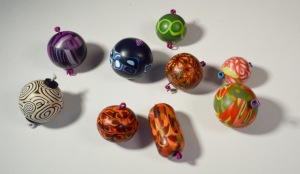
The hardest thing I have to do as an artist is coming up with new designs and color ways. I use my Pinterest page to tag all kinds of beautiful things that I see during my hours of surfing the web. A week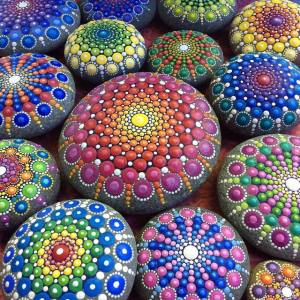 or so ago someone posted a picture on Facebook of the painted rocks that artist Elspeth McLean creates. She is an Australian artist who is currently living in Canada. The vivid colors and dot designs really spoke to me. I tagged the post knowing that someday that image would be helpful. But it stayed in my mind for days. I went to her website and just sat back and took in the colors and designs. I knew that I just had to do something with what I was seeing.
I picked one image that I really liked a lot. I blended colors to replicate the vividness of her painting. I love blending colors. Figuring out recipes is fu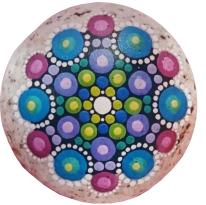 n for me. I seem to have a knack for figuring out what colors are needed to create a certain shade. I don’t have any art training but I did work for a catalog company as a merchandiser in my previous life. I had to check the first print runs to make sure colors were true to the actual product. I learned a lot about correcting colors from the people who were in charge of making the necessary changes. I think that has been a great help for me as an artist. But I digress…
…I mixed up all the colors and used my PCE extruder to spit out the snakes of color to be wrapped by black or other colors. (More on that part in a later post.) I had a lot of the chosen colors left over and decided to play with some extruded canes. Some call them Klimt or Retro canes. Almost every clayer does these at some point in their journey with polymer. They are so easy to do and can create canes that look very complex. The key is to make sure there is good contrast in the colors that you select. I wanted to test how arranging the colors in different combinations would effect the outcome.
 For the first test I arranged the colors in a rainbow with the pink in the middle. Each color family is separated with black and white layers for heavy contrast. And that’s what I got. Good separation of colors with a nice mix of black and white .
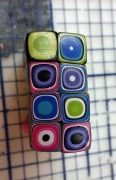
For test number two I doubled up the colors and separated them with black and white again. I thought this line up would give me more tone on tone circles…but it didn’t. Still, I like the result but has a bit more green than I had hoped for.


For test numero tres I decided to get rid of the black and white to see if I could get the tone on tone look of the painted rock. And I did get some of that, but not as much as I hoped. However, that’s OK with me. I like how it looks anyway.


Next challenge is to decide what to make with them…..
Here’s some more links to Elspeth McLean’s wonderful work: http://www.elspethmclean.com/#!gallery/c203e
https://ravenectar.com/blog/hand-painted-stones-elspeth-mclean
https://www.etsy.com/ca/shop/ElspethMcLean
AND some links to some sites to help with color inspiration:
Like so many of you, I LOVE the look of sanded polymer clay pieces. But, also like pretty much everybody – I HATE sanding polymer. It’s messy, it hurts – especially when you sand your fingertips…yes, I have – and it’s boring. AND….if like me….you have issues with chronic pain it is very painful to do the amount of sanding needed for production work. Over the years I have tried several techniques to get the look I want without putting myself into a heightened state of pain.
Many years ago I stumbled across Desiree McCory’s site that described how to use a rotary tumbler and sandpaper to sand beads. I used her techniques for several years but found the process very labor intensive. There HAD to be a better way. I think I have finally found that better way.
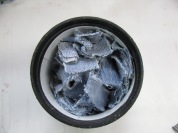
I use a rotary tumbler with plastic media cones from Rio Grande followed by rotary buffing using jean scraps. The media that I been using is the “Standard Plastic Pyramid Media” in Blue, Medium and Green, Fine Cut along with the “Standard Plastic Cone Media, Extra Fine Cut”. I find that this process makes sanding beads a breeze. If I want a bit more gloss to the bead I ‘paint’ on Armor-All Car Finish. I really like the finish I get and it is easy-peasy and pain-free.
I have cheapo tumblers from Harbor Freight, but I’m sure that this process will also work with Lortone tumblers. The black rubber drums can stain/yellow polymer so they must be lined.
Tall yogurt/s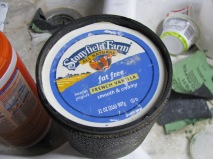 our cream/ricotta containers work well. Liners may need to be cut down the sides to fit the tumbler container. Cut a circle out of the liner’s lid to fit on top. You don’t want any of the black rubber touching the clay. Load the tumbler starting with a handful of plastic media, then beads, then more media, more beads until it the contents are about an inch below the top of the container.
Fill with water leaving about half an inch free to allow for media and beads to move around the container.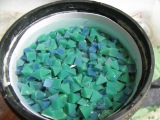
You can start with either the blue or the green media depending on the smoothness of pieces.
I usually let the tumbler run for 12 – 24 hours on each media grit. I have not found that a longer time does any damage to the pieces. After the tumbler has been run pour the contents into a colander and rinse. Make sure to clean the liner and barrel between grits.
To buff by tumbler you need to cut up a pair of old jeans or purchase denim – some suggest using white denim – into 1 – 2 inch square pieces. Layer the jeans and the beads as before but you will be tumbling these dry. I allow this stage to run for between 12 – 18 hours. Again, it doesn’t hurt to run it longer and you can probably run it for as little as 8 hours.
I have seen some post recently that people are using polished rocks. I haven’t tried this yet and would be interested if anyone can share some before and after shots.
I’ll post some other alternatives to hand sanding in my next post.
living a creative and adventurous life
One-of-a-Kind Art Jewelry and Wearable Art
An Art Jewelry Weblog by Grant Diffendaffer
Art Jewelry
Helping you find value, confidence, and joy through creativity!
Tutorials and Innovations in Polymer Clay
Jenny Hermenze
create smart
Saturday, September 14, 2024
Art, Craft, History, Travel, Philadelphia and the World Through the Lens of Creativity
Most are 99.9% almost true... in a way.
